SMT Soldering with MHP50 Hot Plates
In the SMT Lab there are three small hot plates with more customization than our larger ones with respect to hot plate soldering that deserve to be demonstrated. The other day my SDP team’s switching regulator decided to stop functioning, rendering our battery management system that powers our 5V electronics completely bricked. Having tried the larger hot plates multiple times before, I altered our team’s approach with this latest attempt.
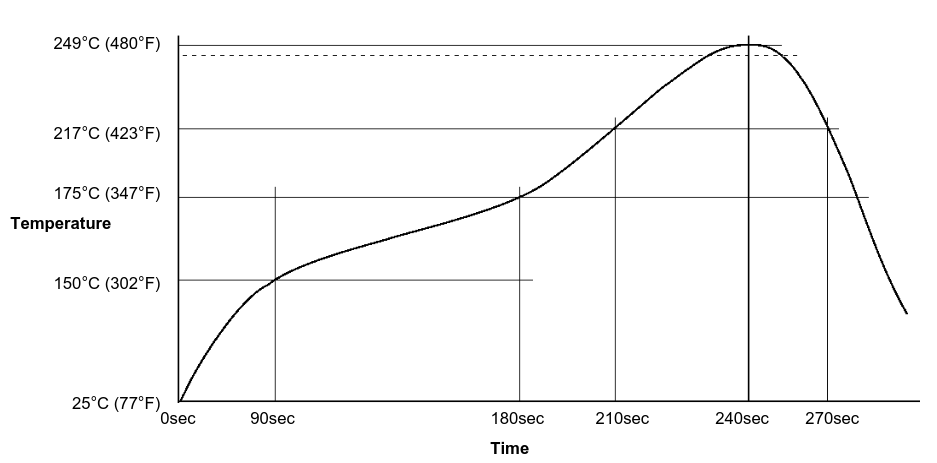
Our switching regulator has a thermal pad underneath which means only soldering the leads would not be enough. Having been the largest pain with our PCB, I took a look into using our new hot plates. As I went through the options menu I was able to figure out that I could set a temperature curve using the reflow setting. The thermal paste we have at M5 is SMD291SNL50T3 which has a temperature curve as shown below:
These temperature curves come the datasheets associated with any thermal compounds related to soldering.
Source: https://www.chipquik.com/datasheets/SMD291SNL50T3.pdf
If you haven’t done hot plate soldering you might wonder which of these temperatures to use when setting the temperature curve in the MHP50’s settings. Within the reflow menu there three phases: Rise, Keep, and Weld. These are represented as sections on the MHP50’s display which are equivalent to the preheat, soak, and reflow stages.
The preheat stage begins to clean the pads and component leads with flux reaching a temperature at or below 150 degrees Celsius. Preheating a board is important for preventing thermal shock and also keeps the thermal paste from splattering from uneven heating. The preheat/rise stage would take 90 seconds until a temperature of 150 degrees is reached according to the curve above.
The soak stage is meant for stabilizing the boards temperature and is when the majority of the flux activates. Different packages need to equalize since they heat up at different rates and cannot take place for too short or too long of a period. Too short would result in not enough flux activation and too long would result in too much flux evaporation. The soak/keep stage would be from the 90 second to 180 second time period until a temperature of 175 degrees Celsius is reached.
Lastly the reflow stage is when the solder melts to create a solid connections between the leads and pads. This stage also relies on strict timing where too short of a time period may prevent the solder to liquidate and too long of a time period can cause components to become damaged. The reflow/weld stage is between the 180 second and 240 second time period where the target temperature is 249 degrees Celsius.
Helpful source: https://www.allpcb.com/blog/pcb-assembly/mastering-the-reflow-soldering-temperature-profile-a-step-by-step-guide.html
Using this guidelines, my soldering experience became much simpler because the end result with our switching regulator was a solid ground plane connection without any imperfections or splattering. This is PSA for anyone doing anything with hot plates to please take a moment to understand how thermal profiles of your solder paste can affect your soldering experience as well as taking the extra timing to perform the needed stages that result in perfectly soldered pads.
Below is small video showcasing how to get into settings where you can set the temperature curve. The MHP50 uses the left side button for selecting when you long press it and the right side button as a save button when you long press it, otherwise they are used as up and down or lower and raise temperature.
Adrian Nelson
Computer Engineering 2026
23 March 2026